
A Diver’s Guide to Photographing Hamlet Mating in the Cayman Islands

Have you ever spotted Hamlets while diving here in Grand Cayman? Your dive guide may have given you a dramatic hand signal, hand outstretched like a theatrical performance “to be or not to be,” before pointing out one of these colorful fish. Or perhaps you have seen one before without even realizing what it was.
Hamlets are known for their striking colors and fascinating mating behaviors. For Underwater photographers and divers, the Cayman Islands offer a fantastic opportunity to witness and capture the unique mating behavior of many different species of Hamlets. This guide will walk you through the essentials of photographing Hamlet mating, helping you create stunning images.
Understanding Hamlet Mating Behavior
Before picking up your camera, it’s crucial to understand what you’re photographing. Hamlet fish engage in a distinctive mating ritual that involves synchronized swimming and color changes. Typically, a male and female pair will rise together in the water column, performing a graceful dance that lasts several seconds. This behavior usually happens during dawn or dusk most evenings when light conditions are softer.
Knowing when and where to find hamlets increases your chances of witnessing them spawning. They prefer coral reefs often near ledges or overhangs. Doing a dive during the day can help you see where the Hamlets like to hang out making it easier for you to find them at dusk when it is getting darker.

Fortunately spotting one or two Hamlets is quite common at most dive sites around Grand Cayman. Several shore accessible sites are especially productive for observing them both during the day and at dusk including both Lighthouse Point and Cobalt Coast. These locations provide excellent opportunities to study their behavior in natural reef environments before sunset.
There are several species to look out for including Black Hamlets, Indigo Hamlets, Barred Hamlets, Butter Hamlets, Masked Hamlets and Shy Hamlets. On occasion you may also encounter hybrids that show characteristics of more than one species which can make identification even more interesting.
Once in the water at dusk the key is to find a single Hamlet and observe it patiently. Stay close enough to follow its behavior but avoid disturbing them. When a pair forms anticipation builds as these fish often hunt together and move in synchrony before transitioning into their distinctive spawning dance.
For a really strong composition aim to capture the individual taking on the male role with its mouth open facing the camera. This creates a more dramatic and powerful photograph.

Essential Equipment for Underwater Photography
Photographing hamlet mating requires specific gear to handle underwater conditions and fast movements:
Camera: A DSLR or mirrorless camera with good low-light performance works best. But any camera that you own will do even a Go Pro will work.
Lens: A macro lens or a lens with close focusing ability helps capture detailed shots of the fish.
Underwater housing: Protect your camera with a reliable underwater housing rated for the depths you plan to dive.
Strobes or video lights: Since mating often occurs in low light, external lighting enhances colors and sharpness. It is always good to have a torch with you as well and a backup torch in case your one unexpectedly dies.
Fins and buoyancy control: Good diving skills and equipment help you stay steady and avoid disturbing the fish and helping keep the reef in pristine condition.
Techniques for Capturing Hamlet Mating Dance
Timing and Patience
Hamlet mating is brief and unpredictable, so spend time observing the fish without your camera to avoid startling them. When you notice a pair beginning their ascent, be ready to shoot quickly. It may take several attempts before you capture a shot you are happy with, as their behavior can be fast and difficult to anticipate.
Camera Settings
Use a fast shutter speed of 1/200 second or faster to freeze motion. Set your aperture between f/9 and f/18 to help isolate the fish and soften the background, but feel free to experiment. Adjust the ISO as needed to achieve proper exposure while minimizing noise. An ISO of 200 was used in the examples above, though higher settings can also work well depending on conditions.
Composition Tips
Focus on the pair swimming together, capturing their synchronized movement.
If you can get a male looking at the camera with it's mouth wide open it can create a powerful composition.
Use artificial light such as strobes to create dramatic effects.
Frame the fish against contrasting backgrounds like coral or open water to make them stand out. Try both Blue backgrounds and black backgrounds.
Shoot from eye level or slightly below to emphasize their upward movement.
Lighting
Lighting is everything underwater. As you descend, natural light diminishes and colors are absorbed at different rates. Warm colors disappear first and reds are the first to fade, often within the first few meters, followed by oranges and yellows. As you go deeper, greens begin to dull, leaving the underwater world dominated by blues.
You’ll need artificial light at dawn or dusk to restore color and illuminate your subject, especially as natural light quickly fades toward nightfall.

How you position your strobe will have a major impact on how your images turn out. With a single strobe, the most effective approach is to mount it centrally above your camera, angled directly toward your subject for even, balanced lighting.
If you’re using two strobes or video lights, position them slightly behind the plane of your housing and angle them outward so the beams intersect in front of your subject, forming a subtle “W” pattern. This technique helps prevent backscatter by avoiding illumination of particles in the water, ensuring that the light falls primarily on your subject rather than the space between you and it.

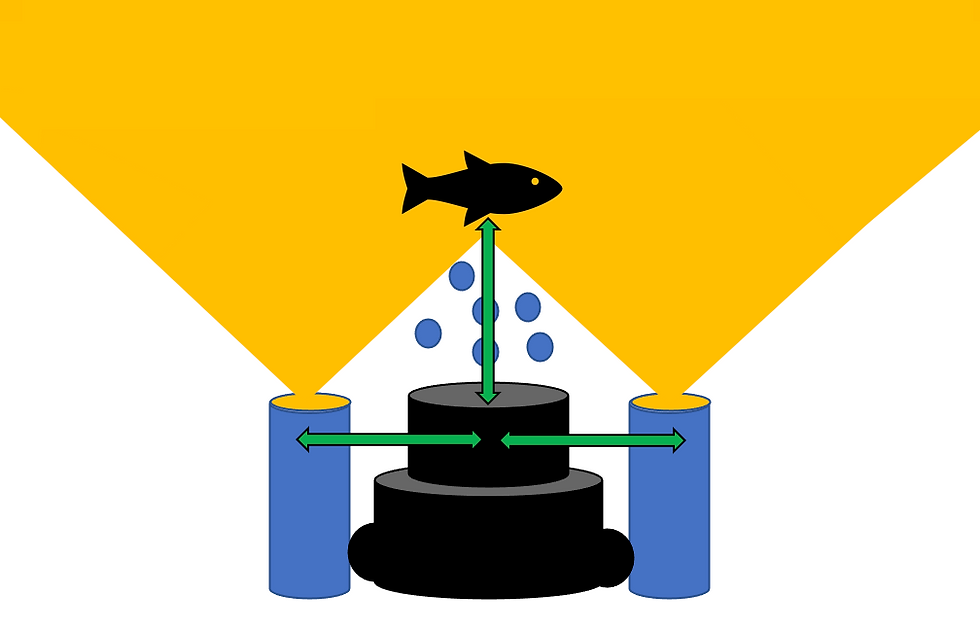
Another important consideration with your strobe positioning. Your strobes should be set at roughly the same distance from your camera as your subject. If your subject is farther away, extend your strobe arms outward to match that distance. If you’re very close, bring the strobes in tight so they sit close to your housing.
Using artificial light, such as strobes, restores these lost colors and reveals the true vibrancy of your subject. Lighting can be tricky but with these few tricks you will be off to a great start to capturing Hamlets and the many amazing creatures around our beautiful reefs.
Ethical Wildlife Photography & Reef Conservation
Respect for marine life is essential on every dive, and even more so when observing hamlets during their mating behavior. Please avoid chasing, touching, or crowding the fish, and maintain a respectful distance at all times to minimize stress and avoid disrupting their natural patterns.
A more effective approach is to begin observing from a wider distance, allowing the fish to behave naturally. Then slowly and carefully move closer as they rise toward the top of the reef and begin to prepare for spawning. Patience at this stage often leads to far better photographic opportunities.
Excellent buoyancy control is equally important. Not only does it help protect the reef from accidental contact, it also allows you to remain steady in the water column. This stability is key for composing sharp, well framed images without disturbing the subject or its environment.
Post-Processing Tips
After your dive, you can enhance your photos with subtle adjustments:
Increase contrast and sharpness to bring out details.
Correct color balance to restore natural hues lost underwater.
Crop images to improve composition and remove distractions.
Remove any particulate with spot healing brush tool (photoshop)
Avoid over-editing; keep the image natural and true to the scene.


Comments